AR
Explore the AR Viewer layout and learn how to use it.
Start AR Viewer
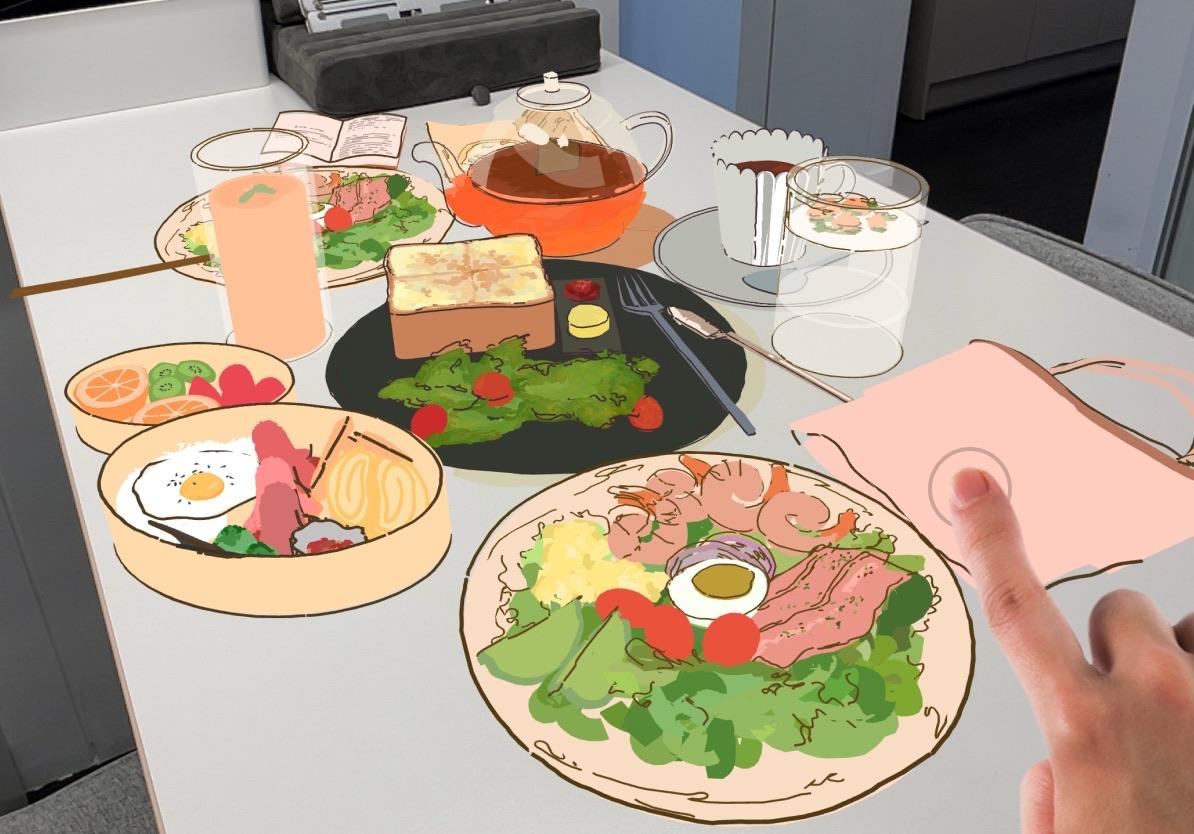
Viewing your sketch in a real-world space provides a unique perspective. Use the AR Viewer to bring any note to life.

Tap AR in System Menu
Start the AR Viewer by tapping AR from View in the system menu at the top left of the screen. Once tapped, the AR viewer will launch immediately.

Move iPad to Position
When you start the AR viewer, your iPad scans your space. Aim your iPad at a flat floor or clear desk to help it understand the environment. Once the floor is detected and your drawing appears semi-transparent, move your iPad to position it exactly where you want.

Tap to Place
After positioning your drawing, tap once on the screen with one finger to place it. Successfully placed drawings will appear fixed in that location.

Tap and Hold to Relocate
To relocate your drawing, long-press the screen with one finger. The AR viewer shows the drawing as semi-transparent again. Lift your finger, then tap once more to place it.
Gestures
Navigation in the AR Viewer is similar to navigation in the note but with some differences.

Tap Question Mark for Navigation Gestures
Tap the question mark button at the top right of the screen to see basic navigation gestures. Swipe or pinch on the screen to rotate, zoom in, and zoom out. Unlike notes, pinch-swiping with two fingers doesn't pan, Instead, it lifts or lowers your drawing vertically. After reviewing gestures, tap the X button to return to the AR viewer.
Tap Screen to Hide or Show UI
Tap the screen once while viewing AR to hide all UI elements. Tap again to show them. This gesture also works during animations.
Lighting
Set up lighting and shadows. Adjust your drawing to blend naturally with your space.

Tap Render Mode for Lighting
Tap Render Mode at the bottom right to start lighting. If materials are applied to your drawing, shading will respond to the lighting just like rendering inside a note, using Materials.
Note
Effects such as Glow are not supported in AR Viewer.

Change the Direction of the Light
Tap the top icon in the lighting tab to change the direction of the light. Just like in the Environment tab, tap and slide to adjust the direction of the lighting.

Change Light Color
Tap the second icon from the top in the lighting tab to change the light color. Similar to the Environment tab, you can set the color and intensity of the lighting.

Automatic Light Color
Tap "Manual" in the lighting color tab to switch to Automatic Light Color. When set to Auto, the color and intensity of the lighting adjust naturally based on the ambient color temperature.

Ground Shadow
Tap the second icon from the bottom in the lighting tab to toggle shadows cast on the ground. Ground shadows apply only to Shaded materials, as they do in notes.

Toon Shading
Tap the bottom icon in the lighting tab to toggle Toon Shading on or off. Toon shading applies only to Shaded materials and displays shading as solid areas rather than gradients.
Animation
A fun collection of ways to view or present your AR drawing.

Select Animation
Tap the animation type at the bottom left to select the animation to play. You can choose from 360 Rotation, Levitation, or Timelapse.

Play or Pause
Tap Play to start the animation. During playback, tap Pause to temporarily stop the animation. Tap Stop to reset to the beginning.